I hated this book. Hated. I rarely hate a book. Often I don't like them, or they bore me, or I just don't care. I hated this.
The book is billed as a history of the Puritans -- the group that led by John Winthrop who settled Charleston and Boston (not the Pilgrims, who landed on Plymouth Rock). What it is, actually, is a snarky, patronizing, self-righteous diatribe lambasting the Puritans (and pretty much every other white person from the 17th century) for not being born in the 20th. We are presented with "Jesus freaks," "religious fanatics," fools who actually believe in God, patronizing English who believe they need to help the Indians, and, generally, a bunch of stooges running around New England.
Yes, Sarah Vowell has discovered that religious Christians from the 17th Century did not live up to the morals and ethics of the early 21st Century. Thank you. They believed that the were superior to other races. They preached Christian charity and kindness, yet punished transgressions severely, with beatings, banishment, and cutting off ears. Vowell notes with disdain the motto on the Massachusetts Bay Colony's official seal, which pictures an Indian in a loincloth saying the words "Come over and help us." Imagine that. The Puritans actually believed that they would be helping the Indians by bring them Christianity. I'm shocked to read this.
Did I mention that I hated it? I don't mind criticizing people, even those who lived four hundred years ago. Although I do think it's unfair not to realize that we are all, to some extent, a function on the time we live in. But what I don't like is the arrogant, flippant tone throughout the entire book. This isn't so much a history as it is some kind of sophomoric rant by someone who apparently just realized that people had different moral compasses back then.*
*And I can't help but notice how much of the book seems to be an indictment of "white men." Surely, in the 1600s, peace and love reigned over the rest of the planet, unspoiled by male Christianity. Vowell notes at length Roger Williams's description of civility among the indians: "If any stranger com in, they presently give him to eat of what they have;" "fewer scandalous sins than Europe, [one] never hear[s] of robberies, rapes, murders;" and "their wars are far less bloody, and devouring than the cruel wars of Europe; and seldom twenty slain in the pitch field." A few pages later, she glosses over an incident wherein "[t]he Dutch in Connecticut, meanwhile, have been trading with the Pequot, but with other Indians, too. How do the Pequot feel about this? They murder a handful of Indians, probably Narragansett, on their way home from trading with the Dutch." No doubt the Pequot were spoiled by their contact with the Dutch.
In short, if you're looking for a history of the Puritans, I'd suggest looking elsewhere. Although I don't know what else might be out there. If you want to feel very good about yourself by reading about those backwards stooges who settled Massachusetts, this is a good book for you.
Thursday, August 16, 2012
The Kitchen Project Part II
The new sink and countertop arrived a few weeks back. For the countertop, at first I had to cut it to size, cut out the hole for the sink, and glue on a piece for the "turn".
Then I sprayed it with Enduro-Var, which was recommended by Jeff Jewitt of Homestead Finishing. I added 5 drops of Jewitt's Medium Brown Transtint dye to each pint of finish. I think I put two coats on the bottom and 5 on the top. I really like the color:
Here is it installed with the sink:
It took me three tries to make the smaller base cabinet to the right of the stove. 18" minus 1.5" is not 17.5" But it all worked out ok.
And here is a little shelf I threw together for the spot next to the window. I thought that this would open up the kitchen more than if I put a cabinet back up.
I really did a terrible job on the shelf. But hopefully it will have enough stuff on it that no one will notice.
Now, I'm building drawers! The fun never ends.
Friday, July 13, 2012
The Kitchen Project -- Part 1
Back in February or so, the girlfriend suggested that I replace the doors in the kitchen. The wall cabinets were cheap (but surprisingly sturdy) frame cabinets with overlay doors and somewhat old-fashioned, visible hinges. I thought to remove the face frames and put in nice frame and panel doors. Of course, the frames were glued on to the cabinets, so I decided to build myself a new kitchen.
This was something I've been considering for a while. The kitchen is small (not that I can change that) and the countertop is a hideous white speckled laminate. However, I have a goal of relocating the kitchen to a different part of the house, so I didn't want to put much money into the current one. And, I want a 36" range, so I don't want to replace the 30" I've got, no matter how rusty the stove top gets. (Kenmore no longer sells a replacement top for this stove.
Our inspiration was from A Country Farmhouse blog. (A blog well-worth perusing. Lovely.) White with a wood countertop.
I figured it would take me a few months to build and install the new cabinets. Well, it's now mid-July. Life, family, and weather have gotten in the way.
I've got the wall cabinets up -- although I still need to cut the shelves. And we haven't bought the hardware yet. More of the base cabinets are installed -- although I screwed up one of them and will have to re-build it.
Here is the original kitchen:
I chose the green paint. I like it.
A few weeks back my friend Paul was in town and we ripped out old wall cabinets and hung the new ones:
I was shocked when everything fit. I will have to remake a door or two. Oops.
The doors are poplar frames with 1/4 birch plywood panels. I bought about 260 bf of rough poplar from a guy up here and milled and cut the boards myself. The hardware is Blum soft-close.
Ripping out the base cabinets, especially the plumbing, was harder than expected. It always is. But most of the cabinets are in place. I just need to shim the one on the left and screw it to the wall:
This was something I've been considering for a while. The kitchen is small (not that I can change that) and the countertop is a hideous white speckled laminate. However, I have a goal of relocating the kitchen to a different part of the house, so I didn't want to put much money into the current one. And, I want a 36" range, so I don't want to replace the 30" I've got, no matter how rusty the stove top gets. (Kenmore no longer sells a replacement top for this stove.
Our inspiration was from A Country Farmhouse blog. (A blog well-worth perusing. Lovely.) White with a wood countertop.
I figured it would take me a few months to build and install the new cabinets. Well, it's now mid-July. Life, family, and weather have gotten in the way.
I've got the wall cabinets up -- although I still need to cut the shelves. And we haven't bought the hardware yet. More of the base cabinets are installed -- although I screwed up one of them and will have to re-build it.
Here is the original kitchen:
A few weeks back my friend Paul was in town and we ripped out old wall cabinets and hung the new ones:
I was shocked when everything fit. I will have to remake a door or two. Oops.
The doors are poplar frames with 1/4 birch plywood panels. I bought about 260 bf of rough poplar from a guy up here and milled and cut the boards myself. The hardware is Blum soft-close.
Ripping out the base cabinets, especially the plumbing, was harder than expected. It always is. But most of the cabinets are in place. I just need to shim the one on the left and screw it to the wall:
Again, a huge sigh of relief when that corner unit fit perfectly between the range and the dishwasher. The floor slopes quite a bit down to the left, so there was a lot of shimming going on. But it's all level and square.
We decided on an apron front sink purchased from Overstock.com. It's about twice as expensive as I wanted, but I do like the look of it.
The sink is about 100 pounds, so I had to re-work the cabinet to put in that shelf and some supporting pieces underneath. I hope it holds. And, I decided to call a plumber for when we're ready -- I don't think I can handle learning how to plumb. That will be for the future.
The counter top will be alder, from Perfect Plank. The whole top cost about $450, delivered, which is about 1/4 the price of anything else I looked into. I will have to finish it myself, but that shouldn't be too hard.
I had taken off work last Thursday and Friday (after July 4th) to finish the sink and the counter top. Of course, the sink was damaged. As was the counter top. That will be work for next weekend.
And then, I need to build drawers.
So far, with all of the hardware, I'm about $2,500 into the project. Most of the cost is hardware -- the hinges and drawer slides (Blum Tandem undermounts -- with the cool soft close feature). Still, I should be able to get everything done for the price of a decent Corian counter top.
Monday, July 2, 2012
The Nightstand
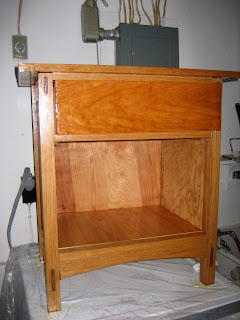
Another early project. My bedroom in the house had no furniture. I downloaded the plans from the Internets (I can't recall which site).
The stand is a basic frame of oak hardwood. The stiles and apron are mortise and tenon joints. The through tenons were tricky. I used an FMT jig, but I didn't have a router bit that went all the way through the legs. Not a big deal -- just rout from one side, flip the piece and route again. Clean out with a chisel.
As you can see, the drawer face is cherry, not oak. I ran out of oak, and had the cherry lying around. Yes, I've been meaning to put on a new face. The finish is Boiled Linseed Oil ("BLO") and Arm-R-Seal polyurethane.
The Rocking Horse
My niece had a baby. Adorable little boy. I built this for his first birthday.
The idea came from The Wood Whisperer, aka Mark Spagnulo. He's a woodworker in Arizona, and his site is a treasure trove of instructional videos. He ran a little charitable program in which folks built this rocking chair and sent in pics. Mark and other sponsors donated money to a children's charity.
The plans were downloaded off The Wood Whisperer website. I bought a panel of laminated pine from Lowes. (FYI -- I much prefer Lowes to Home Depot, but, unfortunately, Lowes is about 15 minutes further away.) I cut out the patterns for the pieces and transferred them to the panel. The pattern for the body was glued on with spray adhesive.
The parts were cut out with a jig saw. I have a Bosch.
Gellstain and sprayed with some Zinser amber shellac.
I had a devil of a time finding the googly eyes. I ended up going to Michaels, the massive craft store. Happy place.
The Wine Rack
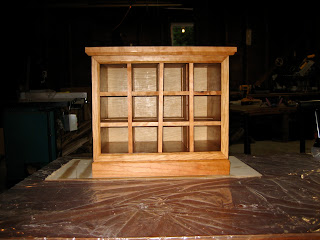
This is one of the first non-shop furniture projects I did, back in 2005. I saw the piece on Woodnet and figured I could do it. It's made from cherry plywood, with real cherry edge-banding, molding and top. Not much else to tell, but I'm pretty happy with it. I don't really have a place for it -- it sits on the floor in the dining room.
A Small Table
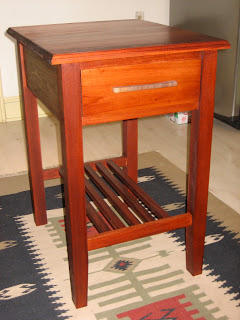
A few years back, my Dad asked for a table. He needed a table for his printer that fit perfectly in the space between his desk and the wall. He couldn't find anything, so he asked me. I'd never built anything without plans, but was able to put together something pretty basic that looked nice. I used poplar, an inexpensive wood, that I had lying around. Generally, poplar is used only for "secondary" wood -- drawer runners, back frames, supports and other items that either wont be seen or will be painted. It can have an unpleasant greenish tinge, and doesn't take stain well without splotching. This is what I ended up with:
Subscribe to:
Posts
(
Atom
)


